Kitchen trash

Posted by Nate in Day to Day.
Wednesday, January 10th, 2007 at 5:02 pm


1-7-2007-12-05-51-pm_0001.JPGWhen we first looked at our house, I seem to recall the trash being in the cupboard at left, on a pull-out track or something.  The cupboard was empty when we moved in, so I put a shelf in and stuffed it with baking sheets and miscellaneous kitchen crap – our trash ended up under the sink, with the composting.

1-7-2007-12-06-06-pm_0002.JPGMy mom and I tackled a little kitchen organizing when she was out here, and one of the things I wanted to do was get the trash out from under the sink.  For whatever reason there’s a heat register under the bottom deck of the sink area and it gets pretty warm in the winter.  Gross, if you don’t get your trash out often enough…

1-7-2007-3-17-44-pm_0004.JPG
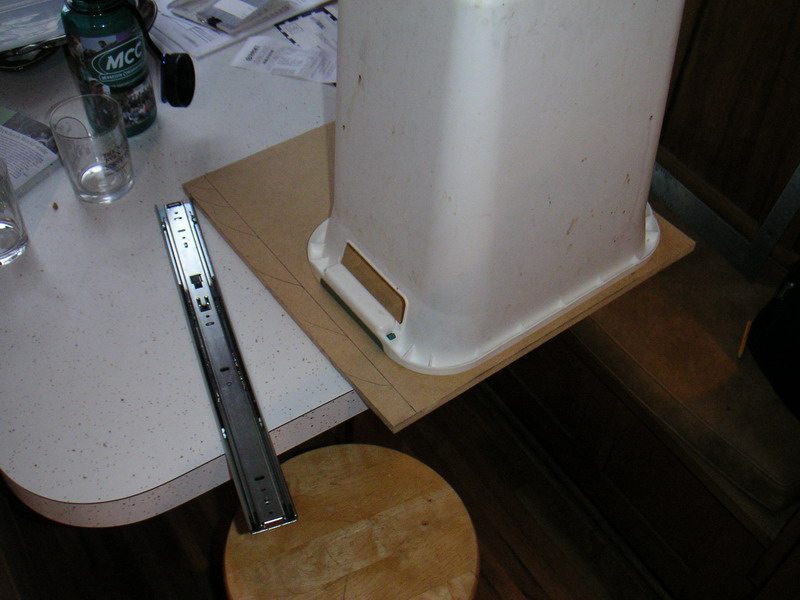
I looked at several pre-built options and nothing seemed to be right – the cupboard is shallow, only 18" deep, and almost all the pull-out options needed 22" of space.  Plus, they attached to the bottom of the cupboard, and that would waste a ton of space up top since the trash can isn’t super tall.  So I decided to order some 18" drawer glides and build a pull-out trash bin.

1-7-2007-3-17-34-pm_0003.JPG
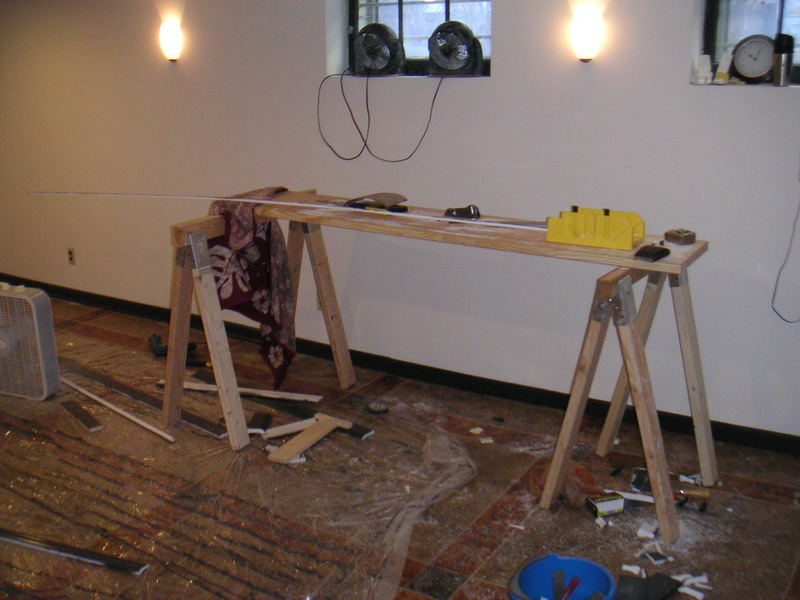
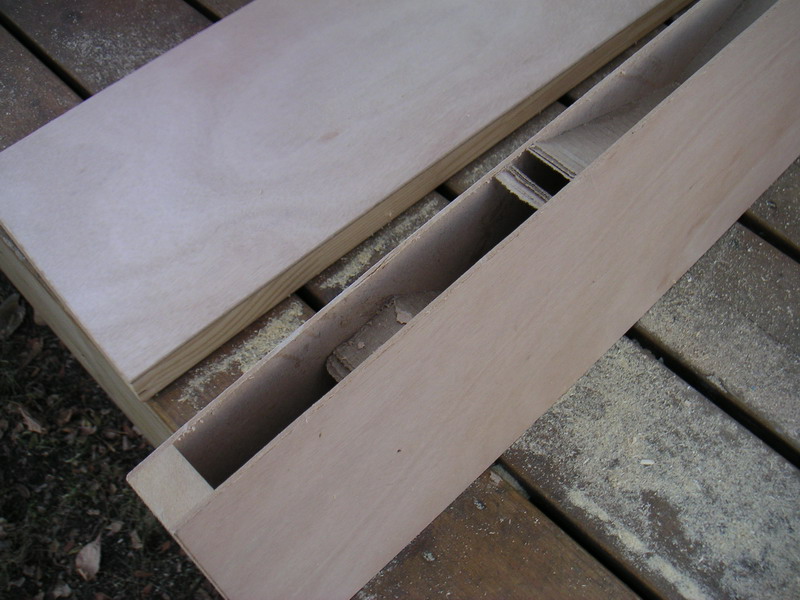
Above right I’m measuring the board to make sure it will hold what I want, plus you can see one of the glides.  Above left I’ve got the board mounted on the glides and going in and out with 2x4s as the inner mounting surface.  I mis-estimated the width of the trash bin when in place and had to chisel out a chunk of wood to make it clear, but that part won’t be seen…

1-7-2007-3-50-22-pm_0005.JPGFinally I’m attaching the angle braces to the cupboard face.  Despite measuring twice and screwing once, I still ended up with a slightly cocked angle, but apparently no one else can see it.  Perfect.

I’m planning to put a new tub on the same surface behind the trash which will be for compost, and also to paint that surface glossy white so it’s easy to clean.  But for now it’s super nice to have the trash where I need it – plus lots of extra storage now that I’m using the space under the sink better.

(PS We know there’s lots of catching up to do…  Don’t hold your breath – we might post about the holidays before we leave, but chances are we won’t blog til February!)

[Pretty much] done!

Posted by Nate in Home Improvements.
Sunday, December 10th, 2006 at 4:24 pm


I’m sure there will be more pictures to follow as we fill in some of the furniture / decor gaps in the basement, but here’s the very latest look at things.  I was up early Saturday morning to keep working on the molding and door trim – it was slow and steady work, not too hard, but took time to get it all fitting right.  We knew we were going to be painting it so we saved a few bucks and got "paint grade" molding instead of the "stain grade".  12-9-2006-10-19-36-am_0001.JPGIn the store I thought it was something like MDF or a wood composite – it wasn’t until I started cutting that I realized it was plastic.  Weird.  I had a few pieces crack a bit on some of the less-than-straight bits of wall, but after I started pre-drilling everything went well.  Finally got to use my saw horses, and they totally saved the day…

12-9-2006-3-50-49-pm_0006.JPGHere’s a closeup of one of the pillar bases, you can see the profile of the molding.  The very bottom bit is actually a separate piece of quarter-round wood.  I wasn’t going to put it on but I’m really glad it’s there – it catches more of the light on the curve and just visually makes the base molding stronger to help delineate the floor and the wall.  That pillar in the pic is the level one – the other one by the drain was an enormous pain to get framed.  Lots of cheating, but it looked good in the end.

12-9-2006-5-57-20-pm_0009.JPGFinally, two pics of the room as we threw furniture together for the party.  Karen had gotten the grass from her old work, and on a whim added it to the room – and I totally love it!  Of course I put my Belgian beer glasses front and center under a light, and dart board is sort of behind where I took those pics from.  Not sure about that orange chair, but the green one actually works well…  We’re going to look at Target or Craigslist for a rug, and we’re keeping our eyes open for a futon.  Whoa.

12-9-2006-5-57-47-pm_0010.JPGI can’t believe where it was the night before – sawdust and plastic everywhere – but it looked so damn good at the party it made it all worth it.  Awesome.

Hopefully Sierra or Karen will post about the party.  Good times, great people, and the best piñata action of the year…  :)

Home stretch

Posted by Nate in Home Improvements.
Wednesday, December 6th, 2006 at 5:47 pm


12-6-2006-7-47-03-am_0002.JPGWell, it’s done – but for the waiting.  The two coats of the gloss sealer are down, and we can walk on it tomorrow morning (or tonight in socks).  I’m hoping to buy base and crown molding tonight so I can prime and paint them and be ready to start installing Thursday or Friday.

12-6-2006-7-47-32-am_0004.JPGIt might be too early, but for the sake of anybody who finds this page in the future while researching a similar project, here’s a little floor post-mortem:

First, here are the previous posts about the floor staining: 1, 2.

On the advice of my mom, who recently tore up carpet, etched, and stained three (or four?) awesome new floors in their house, I went with Mason’s Select transparent concrete stain from Duckback Products, Inc..  My initial dream was acid stain, but my research made me think a floor this old wouldn’t have enough free lime available to react with the acid to create nice colors.  Older concrete is supposed to have more open "pores" which will accept the stain.  Finally, the acrylic stain is available in more colors, and is more repeatable in those colors.  The downside, maybe, is that the natural marbling and variation you get with the acid stain is somewhat lacking in the acrylic, hence my labor-intensive patterning.

The application technique we ended up with went something like this: tape, mask, spray, dab, dry, dab.

  • Tape.  Get good quality masking tape, at least an inch wide, and make sure to press it down on the edge you’re going to paint.  I ran out of the original tape and got a cheap brand from Ace for the final charcoal squares, and it ended up bleeding on most of the edges…  Damn.
  • Mask.  I was lucky enough to have a computer box laying around that had one side coated in plastic.  I cut this up into strips and used it to extend the masking tape while spraying.  Two things: make sure to spray from behind the mask and over it, never towards it, or you’ll get some stain under the mask.  Also, be sure to (carefully!) wipe down the cardboard masking every so often or it will start dripping and dragging stain.
  • Spray.  I used a quart sized handheld sprayer filled with stain, and it worked great for the small areas we did at a time.  One tendency everyone had was to start to overspray after we’d been working for a while – this ended up producing some puddling, which would have been trouble if we were looking for an even color, but actually produced some great texture for us.  On the whole a light, even coat is best and most "workable" afterwards.
  • Dab.  Immediately after spraying, while the stain was still wet, I would come in with a rag dipped in black stain and dab / sponge / stipple some patterns.  This was generally pretty random, but eventually started becoming granite "veins".  The dabbing had the side benefit of removing a bit of the stain as it went, creating more variety.  Next I would do the same with white stain, trying to go "next to" the black for more contrast.
  • Dry.  Let it wait.  You can do some touchup on the puddles if there are any, but mostly just wait 4 hours.
  • Dab.  Go back and add more pattern – you can do much more controlled effects (but with harder edges) once the base stain is dry.  I used the same rag for the black and rolled it in the pattern of the vein, then stippled, dabbed, etc, anything to start to get the texture I wanted.  It was hard because the black doesn’t really show up until it starts to try, so there’s a tendency to overdo it – I ended up doing a quick round on one block and moving on to the next, so by the time I came back it was drying and I could see what was what.  Finally I used a sea sponge to add flecks of white – again, the visual contrast is what we’re after, it really helps the texture seem more "believable". (for lack of a better word)

However, no matter how well you do the above, I cannot overemphasize the importance of prep work on the concrete.  You must get it ready to receive the stain or you’ll end up with a floor that looks nice but the stain either wipes right off or scratches at the slightest touch.  (don’t tell anyone, but I’ve got one tiny section behaving like the latter.  I’m hoping the sealer helped…)

That’s it!

Floor teaser

Posted by Nate in Home Improvements.
Tuesday, December 5th, 2006 at 1:52 pm


Long night of staining last night – thanks to Sierra’s help we managed to get down the whole second layer, the red lines.  The tape was incredibly fiddly to get right, and the gap ended up varying from around 1/8" to 3/8", but the overall effect is fantastic.  It make the sections seem distinct and intentional, and I think to the unknowing eye it will look like grout lines!

12-5-2006-8-53-33-am_0002.JPGThis morning I did some quick touchup trying to even out the color intensity a bit and add some accents, and finally took up the tape.  I was running late, but couldn’t resist snapping a few pictures of the progress, so here you go…

12-5-2006-8-53-19-am_0001.JPGWhat’s left?  Taping a border for the intersection squares, and staining them black.  Hoping to get that done early tonight.  Once that’s dry (3-4 hours) I hope to slap down a quick coat of the glossy sealer, so I can do the second coat tomorrow morning.  The sealer says it needs 72 hours before furniture can go back on it, and by my math that puts us at Saturday morning — just in time to set up for Sierra’s birthday party that evening!  Down to the wire…

Now we’re talking

Posted by Nate in Home Improvements.
Sunday, December 3rd, 2006 at 7:42 pm


Well, the tide has turned in the battle against the basement floor: I’m winning.  In fact, it’s a route.  I am so happy with how it’s turning out so far I really can’t wait to finish it and see the whole thing.  And I know Karen really can’t wait to have the laundry room back – it’s currently full of everything that used to be in our basement, and has been for the last… oh, two months.  Way too long.

So here’s the rundown:  Tuesday after work I rented a 5" hand grinder.  11-30-2006-9-03-49-pm_0027.JPGI’d decided to grind the parts of the edges and corners I’d missed with the previous (second) rental of the walk-behind grinder, and then chemically remove the last bits of pain.  (the second time I used grinding stones which worked pretty well but again couldn’t negotiate the bumps and curves of the floor)  After doing the edges and seeing how good it looked, I had to do the whole thing: 7 hours of horrible hands and knees grinding, shaking out and emptying the shop vac every 10 minutes, etc, etc.  But it looked great by Wednesday morning!!  It also removed the whole top layer of discolors cement and roughened up the surface enough it would take the stain really well.

12-2-2006-1-36-21-pm_0001.JPGVarious busy-ness and mishaps kept me from getting back to it until the weekend, and early Saturday I was off to buy the stain and some masking tape.  The taping actually took a lot of the day (see at right), but I wanted to get it right and have an even pattern.

12-2-2006-5-10-38-pm_0004.JPGBy Saturday evening I had about a third of the main pattern in place, and it was looking very good.  I was tempted to press on, but my back was killing me from all the bent over work and spraying and taping, so I called it a night.

12-3-2006-12-35-49-pm_0001.JPGSunday Karen had off work so she came down to help and it started going much quicker.  She would use the cardboard masks to shield the edges up to the tape, spray a base coat using a hand-sprayer, reposition the masks, etc, until the square was filled.  Then I’d come in with my accent colors – dark and light – and rag roll / blot in some texture and pattern.  12-3-2006-6-29-48-pm_0003.JPGAs the afternoon progressed I started doing some touchup on the last night’s work and found a really nice "vein" pattern that looks sort of like granite or marble.  Really sweet.

At left is where things stand tonight.  I’ve still got to go down and tape the edging for the next round – we’re filling in the grey with a really nice deep red, "Terra Cotta" it’s called.  I’m going to leave a 1/4" overlap of unstained cement, which should look like a grout line in tile, I think that will help the pattern pop a little more.  12-3-2006-6-29-36-pm_0002.JPGFinally the intersections will be stained a dark grey or black, which will also help provide some visual contrast.

Did I mention I love it so far?  I love it.  I’m going to make out with the floor when it’s done.  You can come watch.  $5 at the door.

From Thanksgiving to the Toilet Bowl!

Posted by Karen in Bruno, Friends, Holidays/Birthdays/Etc, Homebrewing.
Monday, November 27th, 2006 at 11:59 pm


I declartable-spread.JPGe Thanksgiving a raging success!  This was Duoteam’s first real adult dinner party.  We used china, dude.  And I was a decorating fool, it was so freaking festive in here.  As I was scurrying around filling dishes with different kinds of candy and nuts and lighting pumpkin-scented candles I suddenly realized that I have become my grandma. 

There was so much food that some of it was barely even touched.  Here’s a list of what I can remember: turkey, ham, Turducknate-plate.JPGen, chestnut soup, pralined yams, beer yams, garlic mashed potatoes and gravy, regular stuffing, oyster stuffing, broccoli salad, green bean casserole, regular rolls and pumpkin rolls with orange butter, pumpkin dip with graham crackers, candied oranges with chocolate ganache, and cranberries.  To drink there was a wide variety of homebrew (Nate’s as well as Scott and Cody’s), homemade ginger ale, brandy, and wine.  Here is a weirdly lit picture of Nate with two, count ’em, two platefulls ready to go.  That’s my boy.

Wait,firemen2.JPG back up.  The Turducken.  The thing of legend and/or myth.  The long-awaited turkey stuffed with a duck stuffed with a chicken.  And in this case, stuffed with creole shrimp.  I decided to postpone being a vegetarian for this Thanksgiving so as to help out with the vast quantities of meat and because frankly, if a Turducken is in your house you damn well better try it!  But there ended up being so much other awesome food that I was just way more excited about, so I didn’t really eat much of the meat.  I tried some of the Turducken, and for me personally, it was kind of a let-down.  And that’s all I have to say about that.  n-s-pie.JPGBut here is an awesome photo of the boys during deep-frying of the turkey. 

Then for dessert there were 3 different kinds of pumpkin pie: regular, lots of coconut, and just a little coconut with bourbon.  And fresh whipped cream.  Mmmmm.  We all ate ourselves into serious discomfort.  Sierra fell asleepsierra-dog-toys.JPG and Nate proceeded to put things on top of her and take pictures.  Like a pumpkin.  And all of Bruno’s toys.  Eventually we all wandered out to the park to play some horseshoes (Grandma and Grandpa Schroeder just gave us a set – sweet!).  Sierra and I dominated. 

In the evening more friends joined us for some mulled wine and Hoopla.  I haven’t spent much time with my friends for awhile now, so for me it was so great just to have everyone together.  And to not be crabby.  And to not fall asleep in the middle of all the fun. 
football2.JPG
Every year Cody puts together a post-Thanksgiving football game which he likes to call the Toilet Bowl.   This was the first year that the Toilet Bowl was held in Minneapolis, and in fact it was at Corcoran Park in our front yard.  We had quiophelia.JPGte a turn-out!  I overheard Cody say later "I’m just not used to playing with people who are… physically fit."  In addition to the football, there were babies!  Or I guess, a baby and a toddler, since Ophelia suddenly became an official toddler, temper tantrums and all (I have yet to actually witness one, I’ve just heard tell from Anni).  Part of the reason for the grbruno-duke.JPGeat turn-out was because Madeline brought her entire family.  This meant a surprise visit from Dusty and Victoria, who were our neighbors for like 3 days before they moved to Iowa.  Boo.  But they brought with them their new dog and Bruno’s new best friend, Duke! 
peacock.JPG
After the football, everyone came over for some snacks and even more homebrew with the addition of Dusty and Victoria’s brews.  The great Pumpkin Beer-Off took place, which was a taste test between Nate and Scotty’s pumpkin beers.  Here is Peacock, showing us her tasting technique, and possibly her future parenting technique…  Needless to say, both beers were delightful and enjoyed by all.  But Nate’s "Liquid Pie" is a tough one to beat.

I’ve missed my friends.  I’ve missed Nate.  I’ve missed having people over and just enjoying their good company.  This was a much-needed holiday, and I’m so thankful to have gotten to spend it with such wonderful people.  And I’m thankful for this pumpkin-turkey.  pict0004.JPG

1-888-5-OPT-OUT

Posted by Nate in Consumers, Homeowners, Recycling.
Sunday, November 19th, 2006 at 6:54 pm


Almost as soon as we’d moved into our house last year I noticed a huge increase in junk mail.  A lot of it was related to being new homeowners (Equity Loans!  House Insurance!  Mortgage Insurance!), but even more was just generic coupons and ads and credit offers.

I picked up some forms almost a year ago intending to send them off ASAP and stop the junk mail, but as things happen I only just sent them last week.  The big one is the Mail Preference Service, with information here.  Also at that link is info on 18885OPTOUT which gets you out of credit card offers.  (MPS charges you if you do it through their site, but you can just send it in by hand and it’s free)  Lastly I sent in the info for ADVO, another agency that I think we’re getting a ton of stuff from.

Sure, we recycle all our junk mail, but how cool would it be to just not get it in the first place?  Those requests take a while to process, but fingers crossed that they’ll cut down on the junk.  I’ll post an update in a few months (if I remember).

Fall Planting, Projects, and … Beer

Posted by Nate in Beer, Home Improvements, Landscaping.
Wednesday, November 8th, 2006 at 8:24 pm


Decided to ride my bike to work today out of respect for national "You Should Probably Start Some Rehab On That Knee" day.  (That and the fact it was almost 70 degrees (!!!) today.)  It went well, mostly, some tightness on the way in, pretty ok on the way home, and now it’s kinda sore – but I still think it’s the right thing to do.  Gotta strengthen up the surrounding muscles, especially considering I haven’t done anything more strenuous than walk the dog since the injury…

11-7-2006-8-38-23-am_0001.JPGThe plant nursery at Karen’s work ended up giving away all their remaining stock with the disclaimer that plugs planted in the fall have probably only a 70% chance of survival.  Of course she snapped up as many flats as she could and proceeded to shove them in the ground all over our yard!  At left is the new view of Duoteam HQ from the front.  My biggest concern with yards I see with native plants all over is that I think it really enhances credibility ("No, really, our yard isn’t overgrown, they’re native plants!") if there’s a clear demarcation and sense of "order" to it.  So I pulled a bunch of leftover concrete pavers (?) and made a border along the walk.  Needs some touchup in Spring, but pretty sweet.  10-30-2006-6-36-10-pm_0002.JPGThe next night Karen planted the rest in the back yard, and since it gets dark shortly after 5 now I rigged up some work lights for her.  She’s crazy – but it should look great next summer!

Inside the house I continue to put off the basement.  (This weekend, really.)  But in the meantime I knocked off a long-time item from my list: shelves in the office.  Floating shelves, no less.  I pretty much followed the outlines described here, and it was actually pretty easy once I got started.

11-5-2006-2-23-56-pm_0003.JPGBasically you slice and dice a hollow-core door, attach a cleat to the wall, and tie the door section to the cleat – voila, shelves!  Above you can see the door cut and the cardboard "honeycomb" being knocked out.  At right is the cleat on the wall.  I feel really good about the strength of those cleats – two11-7-2006-8-12-28-am_0008.JPG 1/4" toggle bolts with the toggle grabbing onto the wood lath behind about 1/2" or more of plaster, so I was able to crank them down pretty well.

Cutting the cleats was the hardest part.  I needed a board 1 1/8" thick to fit exactly inside the door, but had no easy way to cut one accurately.  I knew the frame on my circular saw cut 1 5/8" from the edge…  And I had some 1/2" MDF left over from the kitchen shelves…  So I screwed the MDF onto a 2×4 with another board attached for the fence and ta da!  1 5/8" – 1/2" = 1 1/8"!  11-7-2006-8-31-36-am_0012.JPGIt worked perfectly, and after a good dose of wood glue and some 1" brads, those shelves are as strong as possible.  Still can’t load them up with a full bookshelf or anything, but they should handle a lot.

11-5-2006-9-23-36-pm_0005.JPGFinally, I took Karen on a mystery date on Sunday, which ended up being a Belgian beer dinner at the Birchwood Cafe.  Five courses, five beers, an accordian player, and it was all organic / local food!  At the end there was a secret bonus beer and we got to pick out a glass to take home – Karen grabbed hers early and is flaunting it in the picture.  After all that work, it was great to just relax, eat, and drink!

3 days, 3 beers

Posted by Nate in Homebrewing.
Friday, October 27th, 2006 at 10:05 pm


The kegenator was looking pretty sad with nothing ready on tap, and what with the holidays fast approaching I knew some drastic measures were needed.  Behold!
10-27-2006-9-06-36-pm_0003.JPG
(clockwise from the back)
Wednesday: Rye Stout (Christmas)
Thursday: Jalapeño Cream Ale (Sierra’s birthday)
Friday: Mild Ale brewed with wild rice (Thanksgiving)

Say it with me: yum.  Also have a pumpkin beer aging to perfection which should be the crown jewel of the Thanksgiving lineup, although I have to remember to save some for my dad – it’s one of his favorites.  And an attempted clone of Town Hall’s Thunderstorm, an amber ale brewed with orange blossom honey, lemongrass, and … coriander?  I forget.  Mine’s got the honey and I steeped a whole box of the Mandarin Orange Spice tea in there.  Really delicious so far.

(The shirts and tubs of water are twofold: the shirts block the light which can skunk the beer and the water wicks up the shirts keeping the beer nice and cool as it ferments)

Marathonathon

Posted by Nate in Family, Travel.
Monday, October 23rd, 2006 at 9:11 pm


img_5348.jpgSo the marathon was awesome.  Made me want to run one.  Really.  Maybe.  Either way it was a sweet event, and the weekend trip was – as always – a ridiculous whirlwind visit, but very fun.  We made these hot fluorescent signs to wave as our runners went by, and it ended up being a great plan because some of the places we tried to catch them were like a constant stream of humanity rushing by and it became really hard to stay focused on looking for your person.  I had to keep envisioning what they were wearing and how they were running so I could find them, but they still saw us way before we saw them.  (The signs say Fredel and Laurie, it’s Laurel and Freddie mixed up.  Long story.  Jason made the "run damnu ruuunnnn" sign.  Don’t ask.  Also don’t ask about FroYoHoCho.)

pict0113.JPGHere’s a long distance shot of them behind a lady in a blue vest.  I know my dad got some video, but for now this is what I got.  They’ve got white shirts over black running gear and Freddie has a white hat.

img_5353.jpgAnd here they are at the finish – Freddie did me proud and grabbed a beer as soon as he crossed the finish line.  His IT band was flaring up really badly during the race and Laurel had some cramps in her legs and feet, but they made it!!  Color me impressed.

img_5337.jpgWe also got to have a nice lunch with Grandma and Grandpa – she’s been saving a beer I gave her for a few months and we finally cracked it open.  A nice belgian Grand Cru, yummy.  She even said it tastes like pineapple, which is totally a flavor I get from from that yeast!  True, we were also eating pineapple chunks at the time, but I think that just brought out the flavor in the beer, since it was honestly already there…  Clearly I got my discriminating beer taste from Grandma.

Overall, a great if hectic visit.  Now, if they would just STOP(!!!!) working on I-90 and 94 I would be much happier and maybe make that commute more often again…  Stupid "open-road tolling"…