Archive for the 'Home Improvements' Category

Of summer colds, artisan bread, doggie mischief, and scrap metal

Posted by Karen in Bruno, Food, Home Improvements, Landscaping, Projects.
Sunday, June 22nd, 2008 at 7:15 pm


I woke up Friday morning feeling, as Juliana would put it, trundle-bundled.  I kept telling myself it was just allergies, but by the time I biked my sorry self in to work, I realized I was actually feeling pretty miserable.  So I grabbed my laptop and turned around and biked home.  And proceeded to rapidly deteriorate till Nate was left with a whining, sniffling, sneezing Jabba the Hutt-like blob on his hands.  He was a real champ, even bought me ice cream and cheezy poofs!  Aww. 

So my big plans to get everything in the world done on Friday didn’t happen, grr.  With all the weekend work events I have, my free weekends are like gold to me and I pack them full of yard and house projects, hiking, bike riding, and other ways of making the most out of being healthy and living in a kick-ass city.  A summer cold has no place in these plans.  Sigh.  At least I had the weekend off and didn’t have to be tromping around a prairie or something, but why does it seem like colds often wait for the weekend to rear their ugly head? 

20080622174055_brioche.jpgIn spite of feeling pretty crappy, today was a good day.  Wanna hear about it?  Ok.  Nate started us off right by making these crazy delicious fresh fruit brioche muffins

On a side note, we are watching C20080622172320_attack_dogs.jpgasey Jones the black lab this weekend.  Long-time readers may recall that the last time we watched him, the overall mood was something like this: 

Well, these boys are much older and wiser now… and lazi20080622173050_lazy_puppies.jpg
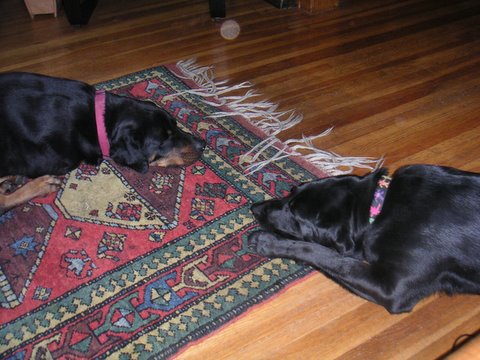
er!  I mean, they still have some of the rough and tumble in them, but last time there was no sleeping!  It was non-stop Wrestle-Mania!  It’s actually kind of nice.  We had hoped this would also mean that Casey had grown out of some of his naughtiness.  But the first night he ate the rest of the loaf of spinach parmesan bread Nate had made off the counter.  And last night he somehow opened the container of brioche dough Nate had just made and ate a big chunk of it!  You do not mess with a man and his brioche dough.  Seriously.  Luckily we caught him before he ate it all, or Nate might hav20080622165804_lunch.jpge taken inspiration from the movie we were watching, Sweeney Todd, and turned him into a meat pie! 

Ok, moving on.  For lunch I made us these delicious salads with spinach from our first CSA veggie delivery!  I also used chives, nasturtium flowers , and lime mint from our window box.  And we had cheese and crackers, with cheese Nate made from one of our batches of yogurt.  It’s been a good food day so far.

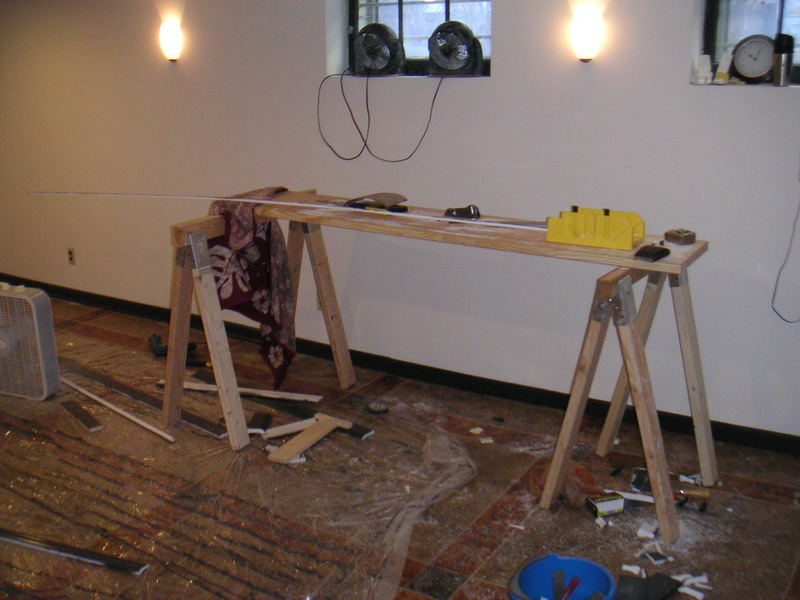
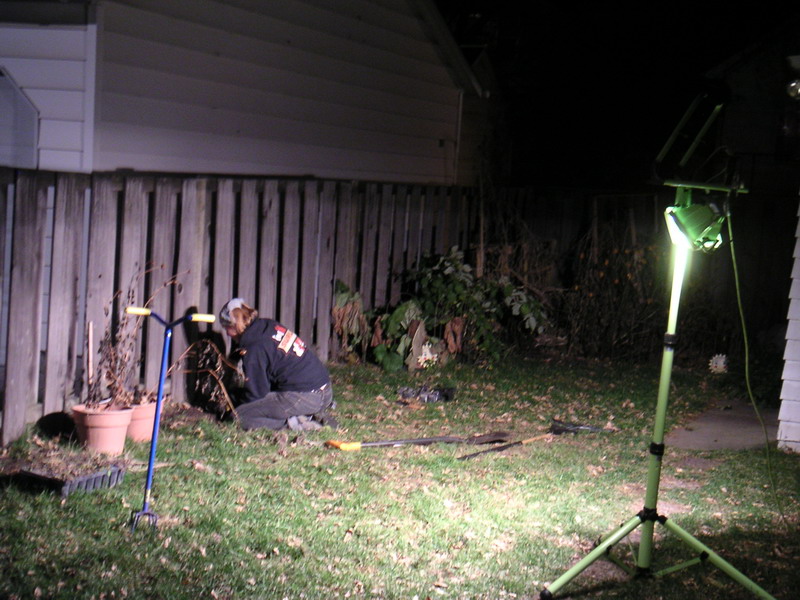
I did my best to not be a total slug and ended up getting quite a bit of yard and garden work done, but Nate worked20080622175203_no_more_shed.jpg his boo-tay off today and tore down our freaking shed!  Brother Dean recently gave us a sawzall, you know, because he had an extra one (?!?).  We had explored the idea of trying to give the thing away, but it was so old and all the bolts were so rusted that it wasn’t really take-apart-able.  In the20080622175340_shedless_possibilities.jpg end Nate decided there were enough people on Craigs List looking for scrap metal that he would just cut the thing apart, stick it in the alley, and post it.  And now behold, the shedless zone.  Oh, the possibilities…  It may not look like much right now, but just you wait! 

And one more thing – HAPPY BIRTHDAY STEVE!

A Few of My Favorite Things

Posted by Karen in Bruno, Day to Day, Garden, Home Improvements, Weather.
Tuesday, February 19th, 2008 at 9:56 am


But first, the big news.  Bruno graduated from Doggy Obedience Level II Sunday evening!  Awww.  He can now (sometimes) do all of the following:  sit or lay down and stay while we do whatever the heck we want and make as much of a ruckus as we want, or when someone comes to the door, walk right past huge distractions (dogs, food) while keeping his attention on us, come to us past a huge distraction, sit and look at us while we greet another person with a dog, and more.  The point of this class was mostly to teach him to do things he already knows how to do in a distracted environment, and to igno20080219071848_pict0002_22.jpgre distractions when we want him to, which is pretty freaking hard for our dog friend. 

For him to really get it down Nate and I now have to make it a point to take him into lots of distracting environments just to train him.  That has so not been my favorite thing to do – something about an 85 pound dog pulling your arm off and completely ignoring you…  But now that he’s already come so far and we have a new understanding of how to work with him in those situations I feel more inspired.  Plus, the better he’s able to behave in those situations, the more places we’ll get to take him!  It’s funny though, I think because of his size he has to be so much better behaved, because you can’t just yank him around like a little yappy dog. 

And now for my new favorite things.  Thing #1:  our new citrus juicer.  The last time we made homemade ginger ale, I hand squeezed lik20080219074136_nate_juicer.jpge 30 lemons and limes and then couldn’t open my hands for a week.  I vowed to get some sort of device for the next time.  So we recently picked up this hot little number at one of our favorite stores to browse in, Kitchen Window.  Nate drools over all the pots and pans, I stare at all the different kinds of cupcake sprinkles, and we both sample as many different kinds of gourmet chocolate as possible until they are ready to kick us out.  Anyway, I tend to prefer non-electric appliances when it’s reasonable, both for the reduced energy consumption and the gratification of using your own muscle power.  So amidst all the crazy expensive electric citrus juicers was this bright orange "Retro Hand Juicer", for something like $25!!  We snagged it and have used it almost every day since!  It’s so unbelievably easy and efficient.  We’ve been drinking fresh squeezed grapefruit juice in the morning, and putting fresh squeezed lemon juice in tabouli and hummus, and I can’t wait to make a new keg of ginger ale knowing how much easier it will be! 

Thi20080219075029_spice_rack.jpgng #2:  our new spice rack.  We cook a lot (and by we I mean Nate, let’s be real).  We have 1 spice rack above our stove but still had lots more that couldn’t fit in there.  So we got this one, also at Kitchen Window, and Nate hung it in the little window nook.  And then he got these wee little hooks for measuring spoons and bottle openers (of which we have many).  It makes my brain feel more organized just looking at it. 

Thing #3: this mint plant.  Lime mint to be exact.  We dug it out of our garden at the end of the season last year and 20080219075217_pict0001_28.jpgput it in a little pot in our kitchen.  And then kind of forgot about it.  I mean we watered it and stuff, but never really used it.  It got real leggy and kinda weird.  But then I all of a sudden like had a hankering for some fresh lime in a drink – mandarin vodka and soda water with fresh lime mint – very summer.  But sometimes you need that when it’s -10 degrees outside!  We’ve also been putting it in our salads lately and I’m convinced this little plant is singlehandedly fending off the February Minnesota winter blues!

Speaking of which, I have to be outside all day tomorrow for work.  Do you know what the weather forecast is for 9 a.m., the time I meet the first group?  -9 degrees, but feel like -26 with windchill.  I hate tomorrow so much already.  No amount of fresh squeezed grapefruit juice or fresh lime mint can help me. 

[Pretty much] done!

Posted by Nate in Home Improvements.
Sunday, December 10th, 2006 at 4:24 pm


I’m sure there will be more pictures to follow as we fill in some of the furniture / decor gaps in the basement, but here’s the very latest look at things.  I was up early Saturday morning to keep working on the molding and door trim – it was slow and steady work, not too hard, but took time to get it all fitting right.  We knew we were going to be painting it so we saved a few bucks and got "paint grade" molding instead of the "stain grade".  12-9-2006-10-19-36-am_0001.JPGIn the store I thought it was something like MDF or a wood composite – it wasn’t until I started cutting that I realized it was plastic.  Weird.  I had a few pieces crack a bit on some of the less-than-straight bits of wall, but after I started pre-drilling everything went well.  Finally got to use my saw horses, and they totally saved the day…

12-9-2006-3-50-49-pm_0006.JPGHere’s a closeup of one of the pillar bases, you can see the profile of the molding.  The very bottom bit is actually a separate piece of quarter-round wood.  I wasn’t going to put it on but I’m really glad it’s there – it catches more of the light on the curve and just visually makes the base molding stronger to help delineate the floor and the wall.  That pillar in the pic is the level one – the other one by the drain was an enormous pain to get framed.  Lots of cheating, but it looked good in the end.

12-9-2006-5-57-20-pm_0009.JPGFinally, two pics of the room as we threw furniture together for the party.  Karen had gotten the grass from her old work, and on a whim added it to the room – and I totally love it!  Of course I put my Belgian beer glasses front and center under a light, and dart board is sort of behind where I took those pics from.  Not sure about that orange chair, but the green one actually works well…  We’re going to look at Target or Craigslist for a rug, and we’re keeping our eyes open for a futon.  Whoa.

12-9-2006-5-57-47-pm_0010.JPGI can’t believe where it was the night before – sawdust and plastic everywhere – but it looked so damn good at the party it made it all worth it.  Awesome.

Hopefully Sierra or Karen will post about the party.  Good times, great people, and the best piñata action of the year…  :)

Home stretch

Posted by Nate in Home Improvements.
Wednesday, December 6th, 2006 at 5:47 pm


12-6-2006-7-47-03-am_0002.JPGWell, it’s done – but for the waiting.  The two coats of the gloss sealer are down, and we can walk on it tomorrow morning (or tonight in socks).  I’m hoping to buy base and crown molding tonight so I can prime and paint them and be ready to start installing Thursday or Friday.

12-6-2006-7-47-32-am_0004.JPGIt might be too early, but for the sake of anybody who finds this page in the future while researching a similar project, here’s a little floor post-mortem:

First, here are the previous posts about the floor staining: 1, 2.

On the advice of my mom, who recently tore up carpet, etched, and stained three (or four?) awesome new floors in their house, I went with Mason’s Select transparent concrete stain from Duckback Products, Inc..  My initial dream was acid stain, but my research made me think a floor this old wouldn’t have enough free lime available to react with the acid to create nice colors.  Older concrete is supposed to have more open "pores" which will accept the stain.  Finally, the acrylic stain is available in more colors, and is more repeatable in those colors.  The downside, maybe, is that the natural marbling and variation you get with the acid stain is somewhat lacking in the acrylic, hence my labor-intensive patterning.

The application technique we ended up with went something like this: tape, mask, spray, dab, dry, dab.

  • Tape.  Get good quality masking tape, at least an inch wide, and make sure to press it down on the edge you’re going to paint.  I ran out of the original tape and got a cheap brand from Ace for the final charcoal squares, and it ended up bleeding on most of the edges…  Damn.
  • Mask.  I was lucky enough to have a computer box laying around that had one side coated in plastic.  I cut this up into strips and used it to extend the masking tape while spraying.  Two things: make sure to spray from behind the mask and over it, never towards it, or you’ll get some stain under the mask.  Also, be sure to (carefully!) wipe down the cardboard masking every so often or it will start dripping and dragging stain.
  • Spray.  I used a quart sized handheld sprayer filled with stain, and it worked great for the small areas we did at a time.  One tendency everyone had was to start to overspray after we’d been working for a while – this ended up producing some puddling, which would have been trouble if we were looking for an even color, but actually produced some great texture for us.  On the whole a light, even coat is best and most "workable" afterwards.
  • Dab.  Immediately after spraying, while the stain was still wet, I would come in with a rag dipped in black stain and dab / sponge / stipple some patterns.  This was generally pretty random, but eventually started becoming granite "veins".  The dabbing had the side benefit of removing a bit of the stain as it went, creating more variety.  Next I would do the same with white stain, trying to go "next to" the black for more contrast.
  • Dry.  Let it wait.  You can do some touchup on the puddles if there are any, but mostly just wait 4 hours.
  • Dab.  Go back and add more pattern – you can do much more controlled effects (but with harder edges) once the base stain is dry.  I used the same rag for the black and rolled it in the pattern of the vein, then stippled, dabbed, etc, anything to start to get the texture I wanted.  It was hard because the black doesn’t really show up until it starts to try, so there’s a tendency to overdo it – I ended up doing a quick round on one block and moving on to the next, so by the time I came back it was drying and I could see what was what.  Finally I used a sea sponge to add flecks of white – again, the visual contrast is what we’re after, it really helps the texture seem more "believable". (for lack of a better word)

However, no matter how well you do the above, I cannot overemphasize the importance of prep work on the concrete.  You must get it ready to receive the stain or you’ll end up with a floor that looks nice but the stain either wipes right off or scratches at the slightest touch.  (don’t tell anyone, but I’ve got one tiny section behaving like the latter.  I’m hoping the sealer helped…)

That’s it!

Floor teaser

Posted by Nate in Home Improvements.
Tuesday, December 5th, 2006 at 1:52 pm


Long night of staining last night – thanks to Sierra’s help we managed to get down the whole second layer, the red lines.  The tape was incredibly fiddly to get right, and the gap ended up varying from around 1/8" to 3/8", but the overall effect is fantastic.  It make the sections seem distinct and intentional, and I think to the unknowing eye it will look like grout lines!

12-5-2006-8-53-33-am_0002.JPGThis morning I did some quick touchup trying to even out the color intensity a bit and add some accents, and finally took up the tape.  I was running late, but couldn’t resist snapping a few pictures of the progress, so here you go…

12-5-2006-8-53-19-am_0001.JPGWhat’s left?  Taping a border for the intersection squares, and staining them black.  Hoping to get that done early tonight.  Once that’s dry (3-4 hours) I hope to slap down a quick coat of the glossy sealer, so I can do the second coat tomorrow morning.  The sealer says it needs 72 hours before furniture can go back on it, and by my math that puts us at Saturday morning — just in time to set up for Sierra’s birthday party that evening!  Down to the wire…

Now we’re talking

Posted by Nate in Home Improvements.
Sunday, December 3rd, 2006 at 7:42 pm


Well, the tide has turned in the battle against the basement floor: I’m winning.  In fact, it’s a route.  I am so happy with how it’s turning out so far I really can’t wait to finish it and see the whole thing.  And I know Karen really can’t wait to have the laundry room back – it’s currently full of everything that used to be in our basement, and has been for the last… oh, two months.  Way too long.

So here’s the rundown:  Tuesday after work I rented a 5" hand grinder.  11-30-2006-9-03-49-pm_0027.JPGI’d decided to grind the parts of the edges and corners I’d missed with the previous (second) rental of the walk-behind grinder, and then chemically remove the last bits of pain.  (the second time I used grinding stones which worked pretty well but again couldn’t negotiate the bumps and curves of the floor)  After doing the edges and seeing how good it looked, I had to do the whole thing: 7 hours of horrible hands and knees grinding, shaking out and emptying the shop vac every 10 minutes, etc, etc.  But it looked great by Wednesday morning!!  It also removed the whole top layer of discolors cement and roughened up the surface enough it would take the stain really well.

12-2-2006-1-36-21-pm_0001.JPGVarious busy-ness and mishaps kept me from getting back to it until the weekend, and early Saturday I was off to buy the stain and some masking tape.  The taping actually took a lot of the day (see at right), but I wanted to get it right and have an even pattern.

12-2-2006-5-10-38-pm_0004.JPGBy Saturday evening I had about a third of the main pattern in place, and it was looking very good.  I was tempted to press on, but my back was killing me from all the bent over work and spraying and taping, so I called it a night.

12-3-2006-12-35-49-pm_0001.JPGSunday Karen had off work so she came down to help and it started going much quicker.  She would use the cardboard masks to shield the edges up to the tape, spray a base coat using a hand-sprayer, reposition the masks, etc, until the square was filled.  Then I’d come in with my accent colors – dark and light – and rag roll / blot in some texture and pattern.  12-3-2006-6-29-48-pm_0003.JPGAs the afternoon progressed I started doing some touchup on the last night’s work and found a really nice "vein" pattern that looks sort of like granite or marble.  Really sweet.

At left is where things stand tonight.  I’ve still got to go down and tape the edging for the next round – we’re filling in the grey with a really nice deep red, "Terra Cotta" it’s called.  I’m going to leave a 1/4" overlap of unstained cement, which should look like a grout line in tile, I think that will help the pattern pop a little more.  12-3-2006-6-29-36-pm_0002.JPGFinally the intersections will be stained a dark grey or black, which will also help provide some visual contrast.

Did I mention I love it so far?  I love it.  I’m going to make out with the floor when it’s done.  You can come watch.  $5 at the door.

Fall Planting, Projects, and … Beer

Posted by Nate in Beer, Home Improvements, Landscaping.
Wednesday, November 8th, 2006 at 8:24 pm


Decided to ride my bike to work today out of respect for national "You Should Probably Start Some Rehab On That Knee" day.  (That and the fact it was almost 70 degrees (!!!) today.)  It went well, mostly, some tightness on the way in, pretty ok on the way home, and now it’s kinda sore – but I still think it’s the right thing to do.  Gotta strengthen up the surrounding muscles, especially considering I haven’t done anything more strenuous than walk the dog since the injury…

11-7-2006-8-38-23-am_0001.JPGThe plant nursery at Karen’s work ended up giving away all their remaining stock with the disclaimer that plugs planted in the fall have probably only a 70% chance of survival.  Of course she snapped up as many flats as she could and proceeded to shove them in the ground all over our yard!  At left is the new view of Duoteam HQ from the front.  My biggest concern with yards I see with native plants all over is that I think it really enhances credibility ("No, really, our yard isn’t overgrown, they’re native plants!") if there’s a clear demarcation and sense of "order" to it.  So I pulled a bunch of leftover concrete pavers (?) and made a border along the walk.  Needs some touchup in Spring, but pretty sweet.  10-30-2006-6-36-10-pm_0002.JPGThe next night Karen planted the rest in the back yard, and since it gets dark shortly after 5 now I rigged up some work lights for her.  She’s crazy – but it should look great next summer!

Inside the house I continue to put off the basement.  (This weekend, really.)  But in the meantime I knocked off a long-time item from my list: shelves in the office.  Floating shelves, no less.  I pretty much followed the outlines described here, and it was actually pretty easy once I got started.

11-5-2006-2-23-56-pm_0003.JPGBasically you slice and dice a hollow-core door, attach a cleat to the wall, and tie the door section to the cleat – voila, shelves!  Above you can see the door cut and the cardboard "honeycomb" being knocked out.  At right is the cleat on the wall.  I feel really good about the strength of those cleats – two11-7-2006-8-12-28-am_0008.JPG 1/4" toggle bolts with the toggle grabbing onto the wood lath behind about 1/2" or more of plaster, so I was able to crank them down pretty well.

Cutting the cleats was the hardest part.  I needed a board 1 1/8" thick to fit exactly inside the door, but had no easy way to cut one accurately.  I knew the frame on my circular saw cut 1 5/8" from the edge…  And I had some 1/2" MDF left over from the kitchen shelves…  So I screwed the MDF onto a 2×4 with another board attached for the fence and ta da!  1 5/8" – 1/2" = 1 1/8"!  11-7-2006-8-31-36-am_0012.JPGIt worked perfectly, and after a good dose of wood glue and some 1" brads, those shelves are as strong as possible.  Still can’t load them up with a full bookshelf or anything, but they should handle a lot.

11-5-2006-9-23-36-pm_0005.JPGFinally, I took Karen on a mystery date on Sunday, which ended up being a Belgian beer dinner at the Birchwood Cafe.  Five courses, five beers, an accordian player, and it was all organic / local food!  At the end there was a secret bonus beer and we got to pick out a glass to take home – Karen grabbed hers early and is flaunting it in the picture.  After all that work, it was great to just relax, eat, and drink!

The battle rages

Posted by Nate in Home Improvements.
Friday, October 13th, 2006 at 2:09 pm


So far I’ve put both a chunk of money and a ton of time into trying to get the paint off the GD basement floor, and I hate to say it but the floor is winning.  Every few days I have a brainstorm and – sure I’ve solved it – hustle off to the hardware store to get the last thing I’ll need to finish this project…  And so far I’ve been wrong.  Here’s a quick list of what I know doesn’t work:

  • ReadyStrip paint remover.
    • It actually works really well — in the places it works at all.  There are as-yet (wait for it!) unexplained patches of the floor that simply Do Not Yield Their Paint.
  • Manual scraping
    • Oh, it works ok for a little while, until you realize you spent half an hour and have (maybe) cleared half a square foot.  Again, as with the stripper, there are DNYTP sections.
  • A big concrete surface grinder machine
    • I feel like this may have done a slightly better job with the diamond cutting blades instead of the carbide ones I got, but in the end it basically amounted to manually scraping the entire floor only much quicker.  Still patches that DNYTP and a few pits in the surface that the blades didn’t get to.
    • The machine was like this one but without everything in that feature list that says "new".  Must’ve been the old model.
  • 3M Safest Stripper
    • Like ReadyStrip but even slower acting.  Does a fantastic job on the paint that will come up at all, but at this point there’s really none left.

So…  That’s discouraging, to say the least.  You may be wondering, as I was, will anything get this paint off?  Well, I’m sure there is some Dimethyl Toxic Whatever horror I could use, but at this point I’m not sure even that would work.  Why?  Well, here’s one thing that works:

  • A Makita angle grinder Karen borrowed from work.

Sweet.  But the thing’s so small already and because it’s an angle grinder you can only hit about a centimeter at a time which makes for really slow going.  Also it’s darn near impossible to avoid uneven grinding, leaving little scallops in the floor (tiny, but still)…

266942435_23df6bffcb.jpgThe revelation for me while grinding was the depth I had to go down to in certain spots to eliminate the color from the paint.  I had read about it happening in concrete but hadn’t seen it, but apparently somehow the paint had sunk down into the pores of the concrete and bonded itself there instead of on the surface.  I’ve also noticed while scraping that there was in fact a layer beneath the orange, a gray gloss that must have chipped up in places before the orange went down – and the places that took the most grinding showed no evidence of this gray!  So…  Seems like the gray paint bonded nicely to the surface and those are the parts I can scrape and strip, but where orange paint hit concrete directly it made patches that DNYTP.  And that depth and bonding make me think even a crazy chemical stripper wouldn’t work and might even make the paint sink deeper into the concrete.

Whoa.  So now I’m planning to rent one of these and grind the whole floor down.  Or call around and see if I can find a stand-up version of that.  Hell yeah.  You haven’t beaten me yet, floor!!

Stupid paint

Posted by Nate in Home Improvements.
Thursday, October 5th, 2006 at 12:31 pm


10-2-2006-7-28-25-am_0011.jpgWe’ve been picking off bits and pieces of the basement project over the last week – on Friday, Sierra and I moved everything out of the basement and into the laundry room and the storage area.  Pretty tight fit in those areas now, but it left the floor empty and made painting the walls much easier.  We were painting on October 1 so we picked a color called "October Sky", it’s a nice creamy light color that should go well with what I’m hoping for the floor and trim.

10-4-2006-7-54-14-pm_0003.jpgI’ve been testing various methods of getting the paint off the floor and having limited success so far…  Manually scraping the hell out of it works sort of, but it’s really a lot of work and very slow.  While at Ace getting the paint I found a product that promises low-odor and great effectiveness – sweet, sign me up!  It worked great on the test patch I tried a few nights ago, so last night I spread it out on about 1/4 of the floor.  I had run the test with a really thin patch of the goop to see how thin I could go, and it seemed that it worked even with a super-thin application.  Awesome.

…only it didn’t work.  I got up this morning to go scrape the paint off and it wasn’t coming – or, it was, but only bits, or what seemed like "half" of the coat of paint, if that’s even possible…  I’m guessing I put it on too thin?  Or the fact that I kept misting it with water last night, thinking keeping it moist would keep it active in such a thin layer?  Anyway, no go, at least at that level of stripper.  So I mopped up the mess I’d made on the section I tried to scrape and went back over the whole thing with a thicker coat.  I’m not going to spray it at all, just leave it until I get back, and hopefully it will have worked its magic on the paint below.  Stupid paint.

Basement progress!

Posted by Nate in Home Improvements, Homebrewing.
Monday, August 28th, 2006 at 11:01 pm


As I start this post, I can hear the nightly fireworks going off from the State Fair – all the way from St. Paul! Whoa. The bad news is I think I’ve heard them every night of the fair so far, which means I’ve been up later than I want for too many nights, now that Karen’s getting up at 5:15 again…

But I’ve been up late working on the basement! Yesterday I hung the remaining pieces of drywall (after figuring out the spacing for the door) and started to mud it. Man, that sucks. I’ve done it before, long ago, but it wasn’t my project – I think it was a garage, or work area – and it didn’t have to be good. This one I want to be good. I’m taking my time, doing 3 or 4 layers in all, but tonight I wanted to just forget about it. It kept "chunking up" on me on certain corners (and it’s almost all corners!!) and I couldn’t figure out why. Ah well. I pressed through it (literally) and got it close enough, I figure I’ll clean it up with a sponge tomorrow morning. That was my day today, and probably for the next two: get up, sponge down the joint compound mistakes, go to work, run errands, come home, and put another layer on. The good news is the flat runs on the walls are looking good, and if anybody’s looking too hard in the corners the room has already failed!

Tonight I needed another project after mudding, so I picked up the hardware for the two doors I’m going to hang and tackled the first one. Yesterday I’d leveled and screwed in the interior pieces of the door frame, and today got the reward for the tedium: it hangs perfectly! No swing at all, it moves wonderfully, and falls right into the latch. Awesome. Only problem (which we’d anticipated, but thought we could work around) is that it doesn’t open all the way around before banging into the main house support beam. Ah well. I anticipated it so much I made sure to get hinges with a removable pin so we could just take the door out if needed. So good progress! My goal is to try to get the mudding done and at least prime the walls and hang the doors before the Chicago kids arrive for the State Fair. We’ll see how that goes…

Oh yeah, and I’ve got a million things fermenting in the basement. Sweeeeeet.