Kegerator, yo.
Posted by Nate in Homebrewing, Projects.
Monday, February 13th, 2006 at 9:50 pm
 So remember when I got that big chest freezer from Karen’s parents? And how I had been dreaming since day one about building a kegerator? Well, today those dreams took a huge step towards becoming real…
  At left is the freezer in the "before" state. The wire running into the side is for the temperature controller that lets me peg whatever temp I want inside. The pic on the right is the first step: getting it on wheels. You can see the whacky corner – an inauspicious start to the project. I wrote down a 3 and added a 2, so the long boards ended up an inch short. I didn’t want to go get any more lumber if I could help it, so I used a bit more glue and an angle on the screws and called it good. Really shouldn’t be that much sideways pressure applied to those joints, and in the final product the cosmetic bit won’t be seen. Primed with Killz2 latex, sealed with an untinted outdoor gloss, and good to go.
 As soon as I got the lid off the freezer, Mr. Helpy McHelperson decided to sit on it. And he wouldn’t get off, even as I started laying in the mitered edges of the collar for the lid… (PS, mitered cuts are really hard to make well with just a circular hand saw.
 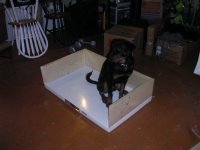 I measured every line from one perpendicular end and used a fence to make the cuts, and still ended up about 1/8" off on 3 of the 8 edges… Not unfixable, but not what I wanted.)
Next time I would come up with a better method for the framing process. 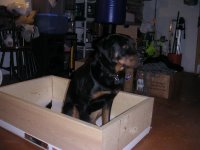 I decided (probably unnecessarily) I didn’t want screw holes on the outside of the wood (staining was still a possibility at this point), so I was going to frame from the inside with 2×2 sticks in the corners. Solid and a good idea, but it proved really difficult to keep things square and level while applying the pressure needed to screw everything together. Maybe next time I’ll tie in the 2×2 to one side first, but it seemed hard to know exactly where to seat it so the miter would be right. Hmm.
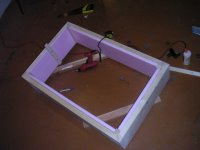 Realizing the insulative properties of wood aren’t so hot, I used 1" foamular insulation board, with an R-value of 5. Plain 2x lumber has about 1.8, so the foam will make a big difference in keeping the freezer cold… I also wanted a way to keep the collar in place on the freezer without screwing into anything on the freezer, so I got a few big washers and drilled holes in some 1×2 to pull through the insulation and adjust the spacing on the sides.
 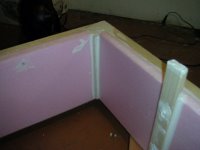 You can see the first board on the right, the rest were added while it was sitting on the freezer in order to get spacing right. In the end a good tight fit, really solid when in place.
The last thing before painting was caulk – I sealed every joint, exposed board end, and all the screw heads and washers. Once it was dry (this was spread over a few days) I hit it with two coats of primer and sealed it with the same gloss finish.
 Finally it was time to fit the lid. (In retrospect I should have used the existing lid holes to keep things in place instead of the elaborate 1×2 down the side method. Next time.) After a few trial and error sizing and depth tests I had a very good fit for the hinges on the lid – it swung and balanced correctly. I had to trim and re-caulk the top edges of the 1x2s since it hit the inside of the lid at first, but that was it for this step.
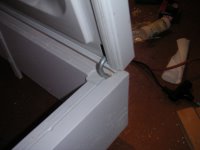 At left is a closeup of the hinge setup. I may need some more sealant around there eventually, we’ll see. Lastly, before I set the whole thing in place I put some weatherstripping on the bottom edge to get a good seal. The top used to be a magnetic seal, now it’s just gravity – and once it was in its final position I could see a few gaps. Some more caulk, some more paint, and some more waiting and I finally had a solid seal around the lid.
  At right is final product – missing, of course, all the faucets! I just today placed the orders for the rest of the gear – the kegs should be here on the 16th, and the gas and liquid equipment soon after. Done deal! The kegerator conversion is well underway, and it’s all totally removable in case we ever need a regular freezer back. So sweet already, and stay tuned for updates: it’s only going to get more awesome!!!
Similar Posts:
- Chest Freezer! ( October, 2005)
- It’s a blog! ( July, 2005)
- Caskerator ( March, 2007)
- How to pack a truck for moving ( August, 2005)
- Project Update ( November, 2005)

February 14th, 2006 at 8:44 am
Awesome project! A question on the whole addition – I assume you needed more space or extra height to accomodate the beer making equipment inside? what all will go in there?
February 14th, 2006 at 9:18 am
Yeah, its purpose is twofold: one, get more height for storage, and two, give me a safe place to drill through for the faucets so I don’t hit any freon lines. I’m not going to do draft towers, so the faucets will come right out the front of the kegerator. Plus, with all that extra height I can fit two kegs on the compressor and probably a few cases on top of the kegs on the floor. So much room in there — I need to get it filled!
February 14th, 2006 at 11:20 am
Not only are you able to tackle complicated projects and have them turn out awesome, you have Mr. Helpy McHelperson there to lend a hand. I’m glad you were able to document his invaluable assistance.
That kegerator is going to hold a lot of good beer! I’m off the Hops and Berries, our new brew supply store, to check out their wine making supplies.
February 14th, 2006 at 11:29 am
That’s so awesome to finally have a homebrew store in FoCo! Their website looks great, hopefully they’ve got what you need…
February 22nd, 2006 at 9:50 pm
I love how you’re like “next time, next time…” ah, how many kegerators will there be?
February 23rd, 2006 at 9:16 am
How many? As many as it takes. :)
Actually, probably just this one for now, but someday I can see building a crazy rig involving glycol-cooled beer lines running upstairs into a complete bar. Oh, yeah.