Project Update
Posted by Nate in Home Improvements.
Saturday, November 12th, 2005 at 5:39 pm
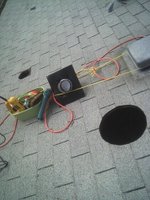
 I’ve been doing a lot of the "un-glamorous" work for this project, and it’s been going slowly, nervously, and at times very frustratingly. Let’s start from where we left off – the vent / light combo was in the ceiling and the light was hooked up but not to the final circuit. Time to install the vent cap in the roof and wrap that guy up… (at left, you can see my tool tub and the rope holding it to an attic vent. The black thing top left is the kitchen exhaust cap I’m installing).
I ended up squeezing this in on what looks like will be the very last day I could have done it – we’re getting some rain right now and possibly snow on Monday. With that forecast in mind, time was of the essence, and I decided to do the skylight cover at the same time.
 For each hole I found the location inside the attic, poked a nail through the center, and used that centerpoint to draw a circle. You can see in the first shot I used a carpentry pencil for this – the graphite was immediately shaken off and disappeared when I started to saw… Luckily I’d bought a lumber crayon which was perfect. The second shot shows the two holes cut and waiting their respective attachments.
But who knew it was going to be such a hassle getting the flashing inserted between the shingles? Not me. Flat prybar here, little elbow grease there, done – so I thought. The theory was sound, but the day only got to about 65 degrees so they weren’t as flexible as I’d have liked. The nails were also hard to find in the level where I thought they should be. (They were probably nailed with an overpowered pneumatic nailgun tearing through the shingles?) My current thinking is that the roof isn’t that old, but it wasn’t installed as well as it could have been. Some of the shingles are either loose or were loose and slid slightly out of place – doesn’t seem to be a big issue at the moment, but I want to keep an eye on it.
 But eventually I got it all in place – I wasn’t able to attach the very top screw into the skylight flashing, it was just too brittle to force. I got all the others in, though, and hit the hell out of it with roofing cement. Also got the vent cap in, no screws just roofing nails on that one. Finally attached the skylight dome – there’s a marked side to face North, that’s the side with some interesting grooved plastic prism-ish things in it. Presumably to reflect more light down the tube?
 One final picture of the skylight tube, this one taken this morning. The messy roofing cement is because I’m a slob, overcaulked it, and then stepped on a corner of it. Oops.
 Anyway, like I said it’s been raining today, but it had the decency to wait 24 hours from installation. I’ll head up in a bit to check things out, but I’m (fairly) confident it’s a solid job and won’t leak. Grr. Better not.
Similar Posts:
- Project: Vent / Recessed Light Combo, pt 2 ( November, 2005)
- Parents projects part 3 ( May, 2006)
- Finalé for now ( November, 2005)
- Project: Vent / Recessed Light Combo ( November, 2005)
- Kitchen lighting ( October, 2005)
