Archive for the 'Home Improvements' Category

Project update the second

Posted by Nate in Home Improvements.
Saturday, November 12th, 2005 at 8:32 pm


In the last post you’ll remember I mentioned frustration and nervousness… Those mostly apply to the wiring section of the project – not the actual "which wire goes where?" part, but the "how the hell am I going to get a wire to a switch box in a reasonable location?" part. I thought I had it all figured out, and my plans were solid: get some fish tape, drill a hole into the wall from above, drill a hole in the wall, drop the tape, find it and attach the wire, pull and go! I knew it was possible I might hit some extra framing studs which could prove to be trouble, but I figured by coming in from the top it wouldn’t be too bad if I had to try a few places, since the hole wouldn’t show up. Wrong… In the first picture you can see the first hole I drilled – something went wrong after I measured carefully on the ceiling and then tried to map that location to the attic floor. Oops.

I actually had to fire a few more holes down before I stopped running into wood, but I finally got in the wall, and the fish tape went all the down to the floor! Great, now to just drill a hole in the wall and look for the tape! No go. The wall on the left is apparently almost solid wood, I must have found the single 1"x1" shaft when I dropped the tape. Crap. Two dud holes in the wall and ceiling so far, and no luck. That was all last night, and I went to bed super pissed off. Nothing was lining up, the easy solution I’d hoped for wasn’t going to work, and I didn’t know where to try next… I was getting nervous I was just ruining our kitchen, with no happy ending in sight.
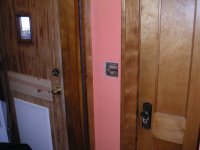
Next morning I found a spot. I had to cut more floorboards in the attic, but I did it cleanly and can patch it up nicely afterwards. Not my favorite location for the lightswitch, but it will work. It has to, it’s the only option left! Of course it took a number of holes again, and one more unfortunate nick in the ceiling. Finally went out and bought a really long drill bit and punched in the exact spot I wanted.
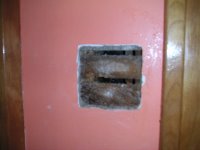
This time, rather than cutting both the lath and the plaster at once, I used a utility knife to score the outline and then used a combination of water from a spray bottle and knife scraping to make the hole. Much cleaner and nicer, as you can see at left. You can also see the trouble ahead – behind the lath are two framing 2x4s, each sticking about 1/2 an inch into the space intended for the switch box. Uh oh. Actually it was sort of planned – I drilled a single hole before I started cutting and explored the space as best I could with a bent wire, so I knew they were there. I opted to split the difference rather than to cut the more central one almost all the way through. I think this way they’ll retain their integrity better, too. Also, that space between them? That’s the space I hit from above. Pretty small target. (pats self on back)
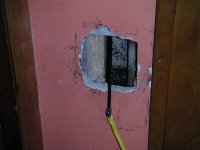
Fish tape dropped, 3 wire cable attached! Ready to pull! You can see I’ve used a jigsaw to cut the 2×4, and in the process of vibration lost a lot of extra plaster. Hmm. Good thing I won’t be doing that on the ceiling for the next two holes. Also, the saw picked up gunk from the roof yesterday and now left it spread all over the wall. Looks like some plaster repair is in my future… And painting, but we knew that.
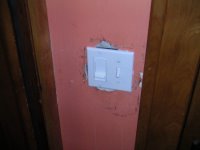
As a final test, after connecting all the wires (up to code) and cramming them in the box, I put the faceplate on to make sure it will all work. While I’m confident (99.9%) in my wiring job, I don’t want to plaster it up yet since I think it will stick a bit to the box and on the off chance I need to change something… well, I’d rather not wreck it. So this is just a test – wired and ready to go, but the other end of the wire is just flopping in the attic. Hopefully one more push tomorrow will see the end of the wiring and completion of the skylight. Then it’s just waiting for the second recessed light to arrive (had to special order it, long story.)

Project Update

Posted by Nate in Home Improvements.
Saturday, November 12th, 2005 at 5:39 pm


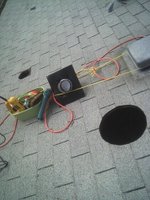
I’ve been doing a lot of the "un-glamorous" work for this project, and it’s been going slowly, nervously, and at times very frustratingly. Let’s start from where we left off – the vent / light combo was in the ceiling and the light was hooked up but not to the final circuit. Time to install the vent cap in the roof and wrap that guy up… (at left, you can see my tool tub and the rope holding it to an attic vent. The black thing top left is the kitchen exhaust cap I’m installing).

I ended up squeezing this in on what looks like will be the very last day I could have done it – we’re getting some rain right now and possibly snow on Monday. With that forecast in mind, time was of the essence, and I decided to do the skylight cover at the same time.

For each hole I found the location inside the attic, poked a nail through the center, and used that centerpoint to draw a circle. You can see in the first shot I used a carpentry pencil for this – the graphite was immediately shaken off and disappeared when I started to saw… Luckily I’d bought a lumber crayon which was perfect. The second shot shows the two holes cut and waiting their respective attachments.

But who knew it was going to be such a hassle getting the flashing inserted between the shingles? Not me. Flat prybar here, little elbow grease there, done – so I thought. The theory was sound, but the day only got to about 65 degrees so they weren’t as flexible as I’d have liked. The nails were also hard to find in the level where I thought they should be. (They were probably nailed with an overpowered pneumatic nailgun tearing through the shingles?) My current thinking is that the roof isn’t that old, but it wasn’t installed as well as it could have been. Some of the shingles are either loose or were loose and slid slightly out of place – doesn’t seem to be a big issue at the moment, but I want to keep an eye on it.

But eventually I got it all in place – I wasn’t able to attach the very top screw into the skylight flashing, it was just too brittle to force. I got all the others in, though, and hit the hell out of it with roofing cement. Also got the vent cap in, no screws just roofing nails on that one. Finally attached the skylight dome – there’s a marked side to face North, that’s the side with some interesting grooved plastic prism-ish things in it. Presumably to reflect more light down the tube?

One final picture of the skylight tube, this one taken this morning. The messy roofing cement is because I’m a slob, overcaulked it, and then stepped on a corner of it. Oops.

Anyway, like I said it’s been raining today, but it had the decency to wait 24 hours from installation. I’ll head up in a bit to check things out, but I’m (fairly) confident it’s a solid job and won’t leak. Grr. Better not.

Project: Vent / Recessed Light Combo, pt 2

Posted by Nate in Home Improvements.
Thursday, November 10th, 2005 at 9:41 am


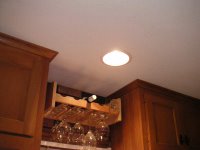
Ok, so I’m jumping the gun a little bit with this "look, it’s finished!" shot, because it’s not finished – I just couldn’t resist. This morning was a rough one: woke up rubbing my eye at about 5:15, and realized something (insulation or plaster dust?) had worked its way pretty well in there. Ow. My eye was comfortable if it was open or if I looked down when it was closed, but it’s damn near impossible to keep your eye in one place when you’re falling back asleep. It kept drifting around and then waking me back up. Damn.

Tried to get it out with drops, no luck. Unfortunately Bruno heard the movement and decided it was probably time to get up, so despite my best efforts to lay quietly in bed so he would go back to sleep, he continued to bump around loudly in his crate and whimper occasionally. Got up, walked, trained, and fed him, and by that time Karen was up and I could jump back in the attic to get some more work done.

Basically the hole just needed some widening to let the housing for the light rest in it – our ceiling is plaster, and the wood lath proved to be a royal PITA to cut with a keyhole saw. (I may end up trying a fine bit and steady hand on the jigsaw for holes 2 and 3.) I also had to scrape down the plaster "keys" a bit to get a better fit on the housing, which in reading more about plaster I’m not sure was a good idea… But it seems really sturdy, in fact some of the lath around the hole was already free of the plaster and nothing moved at all, so I think I’m good. (Confused? I was too. Read up on historic plaster and repair.)

Once the fixture fit, I got to test my wiring job from last night. Popped in a bulb, held my breath, and flipped the switch – Fiat Lux! Now I "just" need to attach a duct for the vent, cut a hole in the roof, and attach the vent cap. And backfill insulation. And get some weatherstripping in there so air can only leak out the vent, which has a backflow prevention flap. And wedge the housing against the floorboards to prevent future rattle from the fan. … And then the skylight and the second light. But, progress!

Project: Vent / Recessed Light Combo

Posted by Nate in Home Improvements.
Wednesday, November 9th, 2005 at 10:44 pm


Well, as the kids say, "it’s on". Insulation has been rolled back, wires have been cut, circuits have been tested. There’s a hole in our ceiling. … and that’s as far as things have gotten so far. You know all those "installs in 2 hours!" claims you see on boxes in the home improvement store? Lies. Maybe 2 hours on a new, up-to-code house, but I’d say add an hour if it’s a house built in 1924, and then tack another one on for being your first major electrical / remodeling work. And then add one more if you have a dog. Doing the quick math, you can see that starting at 7 leaves me well short if I have to be quiet by 10:30 (grad student in the house).

How did it go? Pretty well, considering. Started by removing the existing fixture in the ceiling of the kitchen, and realizing there was one more conduit running into it that I couldn’t originally see. What the…? Charging ahead: I cut the wires I couldn’t unwrap, didn’t label them (did I mention it’s my first big project?), and managed to pull them up into the attic space. Finally traced the wires and felt pretty confident that the three from the hidden (bigger) conduit were 1) always hot, 2) switched hot, and 3) neutral. There was no ground. (did I mention not being up to code?) So the first (smaller) conduit was in fact providing power to the lighting fixtures in the half second story, through the kitchen lighting recess! Why some genius decided to handle this connection inside the kitchen box is beyond me. But I figured it out, and when I re-wired things at the end of the night, I was right. [pats self on back]

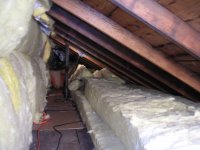
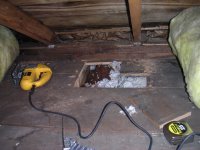
Anyway, the whole point of this drilling and cutting and wiring was to install a Nutone 744NT vent / recessed light combo. It’s not meant for use over a cooking area, but provides a handy method to determine if it’s far enough away – it is. (The skylight method I was considering before wouldn’t have been – probably would have worked, but trouble in the long run). The picture with the jigsaw shows the hole I cut in the "floorboards" in the attic crawlspace, you can see the more modern insulation rolled back on the edges and the old crazy combination of shredded something and "cotton" whatever. I have no idea what it is, but it’s all through the ceiling – which is good, considering we’re in MN. Keeping that in mind, all of the fixtures I’ve selected so far are rated IC – Insulation Contact. They’re allowed to be in the ceiling with insulation surrounding them – not packed tight, but there. Packed tight is asking for a fire, plus it’s not good insulation if it’s packed.

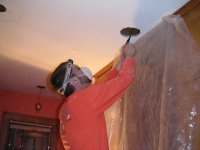
So that’s the update for now. As you can see, I couldn’t find safety goggles and am wearing Karen’s awesome sport shades with yellow tint. (Or I’m an alien: you decide.)

Planning lighting = arrgh!

Posted by Nate in Home Improvements.
Monday, November 7th, 2005 at 9:43 pm


Wow. This is hard. I thought it would be easy – a skylight here, a few recessed lights there, done. But no, it’s all about angles, PAR lamp coverage at certain distances, distance between fixtures, all that… So… Here’s an attached CAD drawing of what I’m thinking at the moment. (The skylight will be sort of in the middle of all that) The one on the bottom right shows the coverage at a few different angles – 40, 50, and 60 – the rest assume 60, which it seems is pretty unlikely I’ll be able to get. So, shoot, is the downward angle of recessed lighting going to be the death of me? Will there be dark spots on the counters? Or will it all work out? I’m going to get a PAR 30L lamp tomorrow and hold it up in a temporary fixture tomorrow to see if I can get a better feeling for the actual throw. Paperwork gets you so far and then you’ve got to start experimenting…

Kitchen lighting

Posted by Nate in Home Improvements.
Wednesday, October 26th, 2005 at 10:21 am


I don’t have any good pictures handy to illustrate this, but let’s just say that our kitchen is suffering from a lack of natural lighting. It’s got a one small south-facing window, but it’s flanked by two cupboards and really doesn’t provide much light to the room. There’s a nice east-facing window, but it has an eave and is largely blocked by our garage and trees. Removing the eave would help, but the previous owner left us a note saying that a family of house finches nests in there every spring – we looked, and sure enough there’s a nest… How much fun will spring be, eating at our breakfast nook and watching baby birds growing up?? More fun than removing an eave.

So I’ve been investigating skylights, specifically tubular ones, more exactly a brand called Solatube. They’re an Australian company that’s been around since the early 90’s and has really got the product "right" – lots of good technology being used to capture every ray of sunlight and send it down the reflective tube into a nice diffuser for what looks like fantastic natural lighting. More importantly for our needs, they offer an attached ceiling vent with the 10" model – it’s a circular intake that surrounds the diffuser and gathers the air into a separate venting tube. The fan is attached to the roof for quieter operation, another bonus. We could really use a vent in the kitchen for various cooking exploits – the main floor fire alarm is incredibly sensitive – and especially to suck out some of the vapor from the 60+ minute boils for homebrewing. I doubt there’s any immediate risk, but I get antsy seeing that much humidity on the cupboards and walls when I’m boiling, especially with winter coming and the windows closed.

But we’re down to the wire now, weather-wise. I’d really like to get this in before we get any snow and it’s freezing all the time, but that means this weekend or next. This weekend is filling up with halloween stuff, and next weekend I’ve got a presentation at a conference in Boston, so… Maybe I’ll take a day off work next week and do it then?

Project: kitchen cabinets

Posted by Nate in Home Improvements.
Tuesday, August 30th, 2005 at 11:16 am


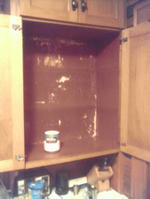
Another project I tackled the week Karen was gone was the kitchen cabinets. While not 100% done, good progress was made, and one cabinet is complete. It started out as you can see on the left – the interior paint was chipped, scratched, and battered, and there were only two shelves that spanned the cabinet. We ended up with a ton of dead space in there as we tried to fit plates, bowls, cups and more – there was just too much room over certain items but no good way to stack them. So I pulled the dishes and shelves out and started to sand the paint on the back wall. After about 10 seconds it occurred to me I had no idea how old this paint was or what it was made of – there could be lead in there! So I stopped sanding, researched lead poisoning and testing, and the next day bought a home lead test kit. I was nervous because a lot of kits have trouble testing red paint (it’s actually red, that picture doesn’t show it well), but this one included a test to make sure the paint didn’t "bleed" into the test. It didn’t, and the test showed no lead, so it was off to the races!

First thing I knew I wanted was several sub-shelves – portable units that would fit on the existing shelves to divide them vertically and horizontally. I also wanted a glasses rack for the top shelf, we had a bunch of wine glasses just standing in there asking to be knocked over and collecting dust. I ended up getting Medium Density Fiberboard (2′ x 4′) to make the shelves, and a nice piece of 1×3 white pine for the rack (short cuts and painted wood, so the white pine’s slow curves seemed ok). I’d never worked with MDF before – it was a good price compared to plywood, so I bought it – but it seems nice and worked well for the job. I’ll have to keep my eyes open for future projects.

I ended up buying a quart of Behr’s Pottery Red paint — we are maybe planning on using it to repaint the whole kitchen, so I thought a test batch in the cabinets would be good to see before we did all that work. So far it’s a bit pinker than the swatch looked, or maybe it’s just different in context..? I’m not sure. We’ll need to look at it more closely to decide.

So after much measuring and cutting I was able to use almost every square inch of the MDF, biuld the shelves, paint them, and install them all before Karen got home! Well, most of them – this is the only cabinet that got painted, the rest still need it, but with the shelves installed it’s a great start. We now have some room to spare in the kitchen! (Temporary, I’m sure…)

Project: under-counter cutting board

Posted by Nate in Home Improvements.
Friday, August 26th, 2005 at 9:51 am


I’m betting this is how my project priority will break down: something will annoy me enough often enough that it will jump to the top of the list, even though there are smarter things I should be doing. That’s how it was with this cutting board, anyway.

We have a really (potentially) slick under-counter cutting board in our kitchen, a great space saver and really handy already. Two problems: it sticks and won’t come out when it’s recessed completely, and there was a growing gap between two of the boards that was filling up with food bits and grossness.

I pulled it out (problem three: it comes out all the way and could easily fall out when loaded) and looked at the bottom – there was a line of "polished" wood, obviously the part causing friction and sticking. I went to work with some sandpaper and sanded down the rail it was sliding on and also a bit of the board, and soon had it sliding much better in and out. I was unable to keep it from sticking during the last 1/4" of the track, so I added a screw into the backboard to keep it offset by that much. Works well. One problem down.

Problem two: the gap. My guess on the gap is that it was caused by repeated attempts to dislodge the previously stuck cutting board by pulling on a single knob in the middle. The glue on the forward two joints held but the third broke and thus was born the gap. I was partially proved right when I was able to enlarge the gap slightly with a carefully wedged knife – the board slid in a tongue and groove on the sides. I cleaned out the crusted food and gunk, sanded a bit, slapped some wood glue in there and clamped it up. Good to go.

Finally, I re-seated the board and moved the makeshift knob from the front to the back but on the cupboard interior, so it would act as a stop when pulling the board foward. Problem three solved.

Still a bit of hesitancy in the motion of the board, might attack it once more with a sander, but on the whole my annoyance has been resolved! Now on to the 99 other things I put off by working on this one…