Home stretch
Posted by Nate in Home Improvements.
Wednesday, December 6th, 2006 at 5:47 pm
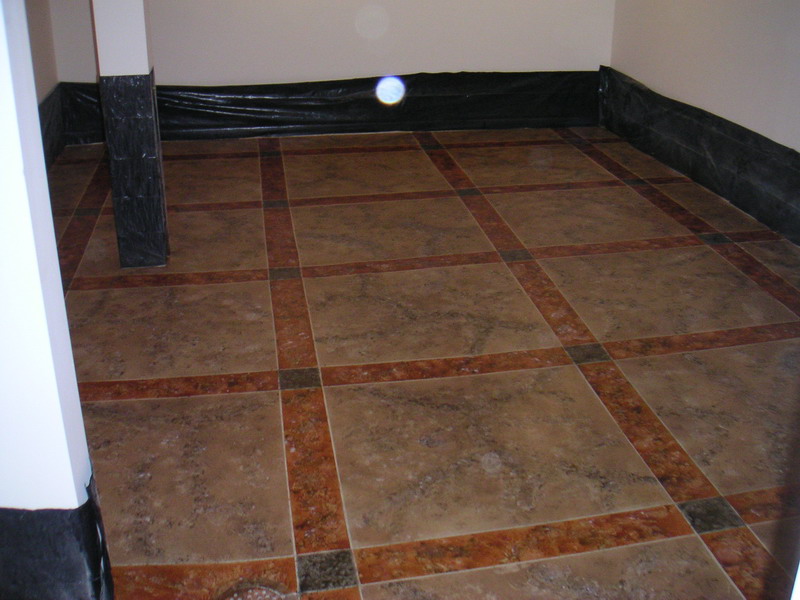 Well, it’s done – but for the waiting. The two coats of the gloss sealer are down, and we can walk on it tomorrow morning (or tonight in socks). I’m hoping to buy base and crown molding tonight so I can prime and paint them and be ready to start installing Thursday or Friday.
 It might be too early, but for the sake of anybody who finds this page in the future while researching a similar project, here’s a little floor post-mortem:
First, here are the previous posts about the floor staining: 1, 2.
On the advice of my mom, who recently tore up carpet, etched, and stained three (or four?) awesome new floors in their house, I went with Mason’s Select transparent concrete stain from Duckback Products, Inc.. My initial dream was acid stain, but my research made me think a floor this old wouldn’t have enough free lime available to react with the acid to create nice colors. Older concrete is supposed to have more open "pores" which will accept the stain. Finally, the acrylic stain is available in more colors, and is more repeatable in those colors. The downside, maybe, is that the natural marbling and variation you get with the acid stain is somewhat lacking in the acrylic, hence my labor-intensive patterning.
The application technique we ended up with went something like this: tape, mask, spray, dab, dry, dab.
- Tape. Get good quality masking tape, at least an inch wide, and make sure to press it down on the edge you’re going to paint. I ran out of the original tape and got a cheap brand from Ace for the final charcoal squares, and it ended up bleeding on most of the edges… Damn.
- Mask. I was lucky enough to have a computer box laying around that had one side coated in plastic. I cut this up into strips and used it to extend the masking tape while spraying. Two things: make sure to spray from behind the mask and over it, never towards it, or you’ll get some stain under the mask. Also, be sure to (carefully!) wipe down the cardboard masking every so often or it will start dripping and dragging stain.
- Spray. I used a quart sized handheld sprayer filled with stain, and it worked great for the small areas we did at a time. One tendency everyone had was to start to overspray after we’d been working for a while – this ended up producing some puddling, which would have been trouble if we were looking for an even color, but actually produced some great texture for us. On the whole a light, even coat is best and most "workable" afterwards.
- Dab. Immediately after spraying, while the stain was still wet, I would come in with a rag dipped in black stain and dab / sponge / stipple some patterns. This was generally pretty random, but eventually started becoming granite "veins". The dabbing had the side benefit of removing a bit of the stain as it went, creating more variety. Next I would do the same with white stain, trying to go "next to" the black for more contrast.
- Dry. Let it wait. You can do some touchup on the puddles if there are any, but mostly just wait 4 hours.
- Dab. Go back and add more pattern – you can do much more controlled effects (but with harder edges) once the base stain is dry. I used the same rag for the black and rolled it in the pattern of the vein, then stippled, dabbed, etc, anything to start to get the texture I wanted. It was hard because the black doesn’t really show up until it starts to try, so there’s a tendency to overdo it – I ended up doing a quick round on one block and moving on to the next, so by the time I came back it was drying and I could see what was what. Finally I used a sea sponge to add flecks of white – again, the visual contrast is what we’re after, it really helps the texture seem more "believable". (for lack of a better word)
However, no matter how well you do the above, I cannot overemphasize the importance of prep work on the concrete. You must get it ready to receive the stain or you’ll end up with a floor that looks nice but the stain either wipes right off or scratches at the slightest touch. (don’t tell anyone, but I’ve got one tiny section behaving like the latter. I’m hoping the sealer helped…)
That’s it!
Similar Posts:
- Now we’re talking ( December, 2006)
- Countdown ( December, 2007)
- Floor teaser ( December, 2006)
- Non-wedding life ( July, 2007)
- What to do? ( September, 2008)

December 6th, 2006 at 7:08 pm
That looks pretty sweet! I’m impressed. The floor in my room is one of the ones we stained, but we just did stippling and such, no tile pattern like you’ve got. Pretty fancy sir!
December 6th, 2006 at 10:11 pm
Wow, looks great. Fantastic job on it.
December 7th, 2006 at 1:27 pm
Very impressed. Wondered, though, if my little girl should have been wearing mask for lung protection while spraying. When it’s all done(after molding, etc.) I’ll need to savor the ambience with a glass of Nate’s latest.